If you enjoy cooking, crafting, gardening this blog will offer
you ideas, projects, tutorials,
book reviews and recipes using
our library's materials.
This is an official blog of the Marin County Free Library.
County of Marin Social Media User Responsibility Guideline: http://www.marincounty.org/depts/ad/divisions/communications/social-media-responsibility-guidelines.
As 2011 comes to a close, and the decorations and ornaments are returned to their places for another year, I thought I'd photograph some of my favorite ornaments to share with you. The ornaments just happen to be birds and eggs.
As a child I remember begging my mother to do a “themed” Christmas tree. I’m not exactly sure why I got this notion in my head, but I really wanted to decorate our tree in an unusual way. Mostly I wanted to use one color for the lights and ornaments. I think one year I suggested pink. Another year I wanted to do only bows for ornaments. My mother, a traditionalist, always refused remarking that I could do whatever I wanted when I had my own tree.
Well I’ve had 15 years to do a themed tree of my own, but not once has it occurred to me to do this. I guess this was the short-lived desire of a romantic adolescent. But as I look over my choices for favorite ornaments I see that I do have a theme happening. Who knows. Maybe there is a themed tree in my future? Tweet, tweet.
I’ve never been big on potato dishes. Baked potatoes are only tolerable with huge quantities of butter, sour cream and salt. And I dread the scalloped potato. But if homemade potato gnocchi are offered,I’ll push my way to the front of the line.
Actually you don’t need to rely on others to make this dish for you because it is really not complicated. Though it does require a light hand and some patience. This is not a dish to whip up after a full day of work. For me this is a special occasion dish, perfect for the holidays. If you gather together friends and family you could make quick work of forming these tempting dumplings. Plus (and this is my favorite part) you can make them ahead of time and either freeze or refrigerate them. To me they actually taste better having sat in the sauce for a time.
Gnocchi are great with almost any Italian sauce. My favorites are gorgonzola, pesto or a meat ragu, but plain old butter and cheese is great too.
The most important things to remember: The less flour you add and the gentler you handle the gnocchi the lighter they will be. I usually bake the potatoes rather than boil them because baking is a drier process, and they absorb less flour. Rice the potatoes while they are still quite warm (use oven mitts or rubber gloves) and this will also yield a more delicate result. Make sure you use Idaho potatoes.
Try not to be overwhelmed by the length of these directions. Lidia gives very precise and full instructions, which if followed,will give you superb gnocchi.
Gnocchi
Yield: Makes 3 generous or 4 slightly smaller main-course or 6 generous first-course servings
3 large baking (Idaho) potatoes (about 1 3/4 pounds), scrubbed
1 large egg
1 teaspoon salt
1/4 teaspoon freshly ground white pepper
Pinch of freshly grated nutmeg
1/4 freshly grated Parmigiano-Reggiano cheese
2 cups unbleached all-purpose flour, or as needed
Bake in a preheated 400°F oven until tender, about 40 minutes (Alternatively you can boil the potatoes) Place the potatoes in a large pot with enough cold water to cover. Bring the water to a boil and cook, partially covered, until the potatoes are easily pierced with a skewer but the skins are not split, about 35 minutes. Drain the potatoes and let them stand just until cool enough to handle. (The hotter the potatoes are when they are peeled and riced, the lighter the gnocchi will be.) Working quickly and protecting the hand that holds the potatoes with a folded kitchen towel or oven mitt, scrape the skin from the potato with a paring knife. Press the peeled potatoes through a potato ricer. Or the potatoes can be passed through a food mill fitted with the fine disc, but a ricer makes fluffier potatoes and therefore lighter gnocchi. Spread the riced potatoes into a thin, even layer on the work surface, without pressing them or compacting them. Let them cool completely
In a small bowl, beat the egg, salt, pepper, and nutmeg together. Gather the cold potatoes into a mound and form a well in the center. Pour the egg mixture into the well. Knead the potato and egg mixtures together with both hands, gradually adding the grated cheese and enough of the flour, about 1 1/2 cups, to form a smooth but slightly sticky dough. It should take no longer than 3 minutes to work the flour into the potato mixture; remember, the longer the dough is kneaded, the more flour it will require and the heavier it will become. As you knead the dough, it will stick to your hands and to the work surface: Repeatedly rub this rough dough from your hands and scrape it with a knife or dough scraper from the work surface back into the dough as you knead.
Wash and dry your hands. Dust the dough, your hands, and the work surface lightly with some of the remaining flour. Cut the dough into six equal pieces and set off to one side of the work surface. Place one piece of dough in front of you and pat it into a rough oblong. Using both hands, in a smooth back-and-forth motion and exerting light downward pressure, roll the dough into a rope 1/2 inch thick, flouring the dough if necessary as you roll to keep it from sticking. (When you first begin making gnocchi, until your hands get the feel of the dough, you may find it easier to cut each piece of dough in half to roll it.)
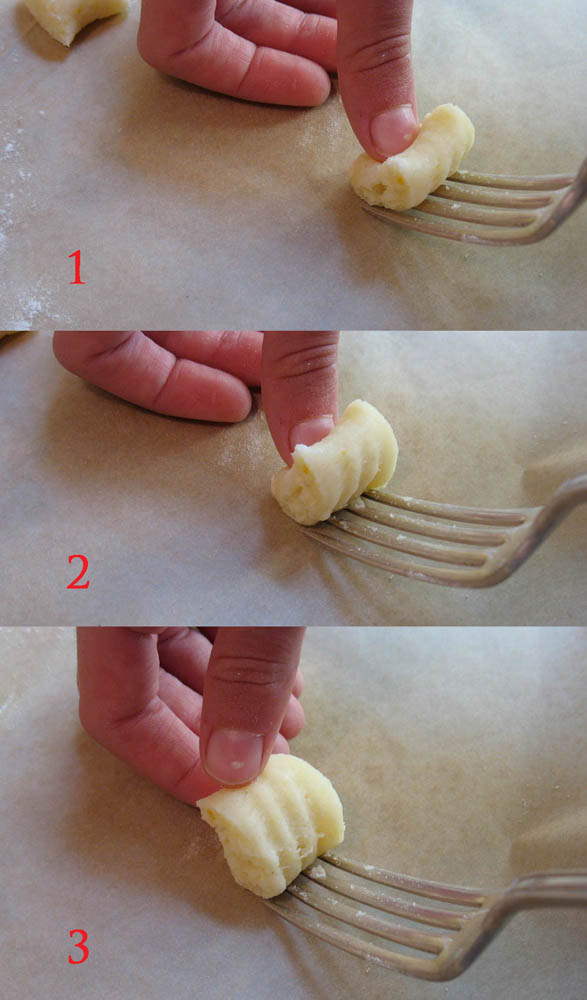
Slice the ropes into 1 inch-long pieces. Sprinkle the rounds lightly with flour and roll each piece quickly between your palms into a rough ball, flouring the dough and your hands as needed to prevent sticking. Hold the tines of a fork at a 45-degree angle to the table with the concave part facing up. Dip the tip of your thumb in flour. Take one ball of dough and with the tip of your thumb, press the dough lightly against the tines of the fork as you roll it downward toward the tips of the tines. As the dough wraps around the tip of your thumb, it will form into a dumpling with a deep indentation on one side and a ridged surface on the other.
Set on a baking sheet lined with a floured kitchen towel and continue forming gnocchi from the remaining dough balls. Repeat the whole process with the remaining pieces of dough. At this point the gnocchi must be cooked immediately or frozen.
To cook gnocchi:
Bring six quarts of salted water to a vigorous boil in a large pot over high heat. Drop about half the gnocchi into the boiling water a few at a time, stirring gently and continuously with a wooden spoon. Cook the gnocchi, stirring gently, until tender, about 1 minute after they rise to the surface. (You can cook the gnocchi all at once in two separate pots of boiling water. If you make a double batch of gnocchi, I strongly recommend cooking them in batches in two pots of water.)
Remove the gnocchi from the water with a slotted spoon, draining them well, and transfer to serving dish with some of the sauce to be used. Cook the remaining gnocchi, if necessary. Top the gnocchi with more sauce and serve. When saucing gnocchi, remember this tip: If the sauce is too dense or the gnocchi seem too dry, use some of the gnocchi cooking water to thin the sauce and moisten the gnocchi, as you would with pasta dishes.
To precook gnocchi:
Cook the gnocchi as described above, remove them with a skimmer, and spread them out in a baking pan lightly coated with melted butter. When ready to serve, return the gnocchi to a large pot of boiling salted water until heated through, 2 to 3 minutes. Drain thoroughly and sauce and serve according to the particular recipe.
Another option is to cook the gnocchi and put them in a baking dish with the sauce, cover with foil and put in the refrigerator. When ready to serve bake the gnocchi at 350 degrees until warm (for about 20 minutes) This method is best with sauces other than gorgonzola.
To freeze gnocchi:
It is best to freeze gnocchi uncooked as soon as they are shaped. Arrange the gnocchi in a single layer on a baking pan and place the pan in a level position in the freezer. Freeze until solid, about 3 hours. Gather the frozen gnocchi into resealable freezer bags. Frozen gnocchi can be stored in the freezer for 4 to 6 weeks.
To cook frozen gnocchi:
Frozen gnocchi must be cooked directly from the freezer in plenty of boiling water, or they will stick together. Bring 6 quarts salted water to a boil in each of two large pots. Shake any excess flour from the frozen gnocchi and split them between the two pots, stirring gently as you add them to the boiling water. It is important that the water return to a boil as soon as possible; cover the pots if necessary. Drain the gnocchi as described above and sauce and serve according to the specific recipe.
Haven't you always wanted to snap your fingers and change the weather. With paper snowflakes its practically that easy. All you need is some paper and sharp scissors and you can create your own snow storm to dress up your home.
Try out different colors!
Here is a gift I topped with a snowflake that I had sprayed with glue and then dusted with glitter.
There are many ways to fold your paper, if you are curious just look around the Internet. This clip shows my favorite way to fold your paper to make a snowflake.
After making 20+ snowflakes in the last few days I can still say I really enjoy this simple craft. The best part is opening your folded paper after you've finished cutting out your design. I'm always surprised! I tried a few designs from the book Paper Snowflakes: for all ages by Robert P. Kelley, but mostly I looked at pictures on the web to get inspired.
Origami paper (which is thinner than regular computer/copy paper) is nice to use to get really intricate designs, but your snowflakes will be floppy. Computer/copy paper is sturdier for making garlands, but it is a little harder to cut since it is heavier paper. Try using dental floss or heavy thread to make a garland. Be careful unfolding your snowflake especially if you have a really delicate design, you don’t want to tear it. To get your paper really smooth after you unfold it, press your snowflake with an iron set on low.
If you should ever consider making a cake when you’re short on time, please reconsider. The first time I made this cake I had to pull it out of the oven a tad early in order make it to an appointment. By the time I got back home the cake had sat for an hour and a half in the pan. It had a sunken center and looked very sad.
I tried to invert it onto plate but it was stuck. I put it back in the oven to soften the topping, but the cake just wouldn’t budge from the pan. My last ditch effort involved whacking the pan with a wooden spoon. Needless to say the result wasn’t pretty. But my daughter and I decided we’d try the cake anyway. It was good, very good. So good we both had two slices before dinner and a third slice after dinner.I made the cake again, this time with no rushing or interruptions.Now it looked as good as it tasted!
I was excited to make this cake because, except for cranberry sauce, I'd never really used fresh cranberries in a dish. Even though the holiday season is the customary time to use them, you can always buy a couple of bags and freeze them for later. Cranberries will last 9 months in the freezer and can be used in recipes without thawing.
It uses cranberry sauce, but I wanted to use fresh cranberries. So I also consulted a recipe from the magazine “Everyday Food.”
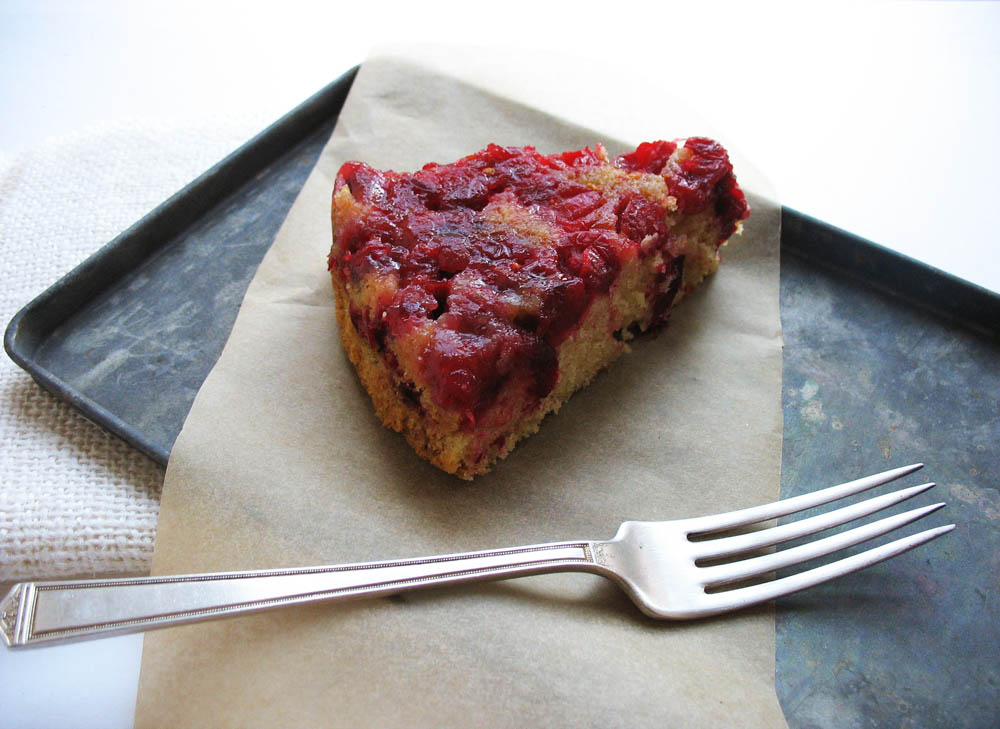
Cranberry Upside-Down Cake
Upside-down cakes are best served warm. They are lovely with a scoop of vanilla ice cream for a real comfort food dessert. Or have it plain for a sweet and satisfying breakfast treat. Tips--Find a plate or serving dish ahead of time that fits the opening of the pan in which you plan to bake the cake. Use strips of baking parchment in the pan to help release the cake from the pan (see picture below).
Topping:
½ cup sugar
zest from half a tangerine or orange
2 cups cranberries, rinsed in water
2 tablespoons butter
Cake:
6 tablespoons butter
½ cup sugar
1 egg and 1 egg yolk
1 teaspoon vanilla extract
1 1/3 cup flour
1 teaspoon cinnamon
zest from half a tangerine or orange
1 ½ teaspoons baking powder
¼ teaspoon salt
½ cup milk
Preheat oven to 350 degrees with rack in the middle of the oven.
Grease the sides and bottom of a 9 inch cake pan or cast iron skillet
In a small bowl stir together the sugar and zest.
Add cranberries and stir again. Pour the cranberries mixture evenly over the bottom of the baking pan. Pressing the cranberries down into a single layer. Dot with the 2 tablespoons of butter.
To make the cake: In a bowl beat together the butter and sugar until fluffy. Add eggs, vanilla and zest and mix until well combined.
In another bowl whisk together flour, baking powder, and salt. Stir half of the flour mixture into the butter mixture. Stir in half of the milk followed by rest of the flour mixture. Finish by stirring in the remaining milk. Do not overmix.
Carefully spoon the batter over the cranberries and gently smooth batter. Bake cake until top is golden and a wooden toothpick inserted in the center comes out clean, 35-30 minutes (Using a cast iron skillet may speed up the baking time). Let cake cool for 10-15 minutes.
Run a knife around edge of cake. Invert cake onto a plate, using a kitchen towel or hot pads to hold plate and pan together, flip cake onto plate.