Thursday, October 23, 2014

Frozen Yogurt


Recently I purchased an ice cream maker.  I have been so close to purchasing one for the last few years, but have always stopped myself until now. Then last month I found myself standing in front of a display of ice cream makers.  It was too frivolous a purchase. I started to leave, but then remember a 20% off coupon in my wallet.  I took that as a sign.  The universe wanted me to be an owner of an ice cream maker.  I loaded it into my car,  and immediately felt guilty for purchasing such a large nonessential kitchen tool.  I left it in my car for a week before I finally decided I would keep it.  As I brought it into the house my husband took one look at it and commented on the dangers of having too much ice cream in the house.  "Oh no," I said, "we can make frozen yogurt. It is much healthier and easier," and hoped this was really true.  Well luckily it is true.  Picture me wiping my worried, sweaty brow and heaving a big sigh of relief, cause I really wanted to love my new toy.


Turns out you can make incredibly tasty low fat frozen yogurt quite easily with just a few ingredients.  The texture is smooth and creamy and it has the perfect amount of tart.  It also turns out you can even make frozen yogurt and ice cream without an ice cream maker. Though this method is more time-consuming.  Still I'm very happy to have my machine.  For those of you who want to try the non-machine method see below for instructions.

In Just Dessert by Alice Medrich she says "...ice cream making at home is not an exact science...there are so many variables: machines differ, fruit varies in sweetness and ripeness, and every cook's palate is different. This very inexactitude is an invitation."  I have certainly found this to be true and suggest you use this recipe as an "invitation" to play around with your ingredients.  

The library has great eBooks on the basics of ice cream and frozen yogurt.  These can be found in our Enki collection of eBooks.

Making Ice Cream and Frozen Yogurt by Maggie Oster has a straightforward basic vanilla yogurt recipe that you can get creative with and experiment with all sort of fruits and flavor additions.

3-4 cups plain yogurt of your choice: lowfat, 2%, whole, or Greek
1/4 to 1/2 cup honey or other sweetener to taste ( I like to use agave)
1 tablespoon vanilla
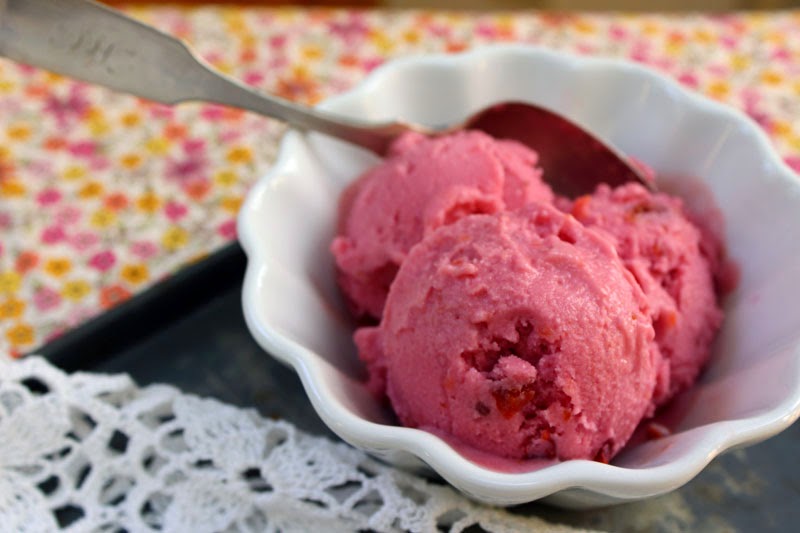
Variations: 2 cups of pureed fruit (I added fresh strawberries for my first batch)

Combine all ingredients in a blender, mixer, or food processor until smooth.  Chill mixture and then follow the procedure for your maker. (Or see below for non-machine method) Initially the frozen yogurt will be very soft straight out from the ice cream maker.  To firm the mixture store in freezer for 30 minutes to 1 hour.


Next I tried roasted apricot frozen yogurt, followed by a roasted plum and blackberry frozen yogurt. Incredible!  Roasting most fruit intensifies the flavor.  I just pitted the fruit and sprinkled a little granulated sugar on the apricots and plums and put them in the oven at 375 degrees until they started to soften and caramelize a bit on the edges.  Then I removed the skin from the apricots (but not the plums)  pureed it and added it to the above recipe with a little splash of buttermilk.
To make frozen yogurt without a ice cream maker:  
Prepare the mixture and pour into a shallow tray such as a cake pan.  Place tray in the freezer for 30 minutes to 1 hour or until mixture is mush but not yet solid.  Scrape mixture into a chilled bowl and beat with an electric mixer (or food processor) until mixture is smooth.  Quickly return the mixture to the tray and the freezer.  When almost solid repeat the beating process.  Return to the tray and cover mixture with plastic wrap to prevent ice crystals from forming on top.  Place tray in the freezer until firm, but still scoopable.


Roasted plum and blackberry frozen yogurt
  Making Ice Cream and Frozen Yogurt by Maggie Oster

 Everything Ice Cream, Gelato and Frozen Desserts Cookbook by Susan Whetzel

Sunday, August 17, 2014

Recipe tinkering


Do you have trouble sticking to a recipe?  And feel compelled to tweak the ingredients?  Yes? Well you're not alone.  I am a compulsive tweaker; and no that isn’t a new dance.   It’s a fun way to cook if you don’t mind the risks involved, as seen below.
Banana, chocolate & peanut butter ice pop fiasco

There are some types of recipes that are particularly well suited to this way of cooking: smoothies of course, granola, salads, soups, and popsicles.  Popsicles or rather ice pops are great for letting your inner recipe developer out.  Ok, maybe some of you don’t like to free-form cook. That’s cool, because I have a cookbook for you.  It’s called Perfect Pops by Charity Ferreira.   It’s a great little cookbook with lots of colorful pictures and creative recipes.  
You can easily find the molds these days or make do with paper cups.  I found my molds on sale at my grocery store for a few bucks.  But you can also find a huge variety of shapes on Amazon.  The other helpful tool you’ll need for ice pops is a strong blender or food processor for pureeing your ingredients.


These ice pops were inspired from reading Ferreira’s cookbook and making use of what I had on hand.  I had a blast tinkering away in the kitchen.

These are made from layered pureed mango, pineapple and coconut milk.  I got the idea from the recipe for Mango Lassi Pops in the cookbook.  
Take 2 1/2 cups cubed mango, 3/4 cup whole-milk yogurt, 1/4 cup sugar, 1-2 teaspoons lime juice and 1/4 teaspoon ground cardamon and puree ingredients in blender or food processor until smooth.  Taste and add more lime juice or sugar if desired.  Spoon the mixture into the molds and freeze for 6 hours.  
These ice pops (my favorite) were made by cooking down a couple of cups of blueberries and a little agave in a saucepan on the stove.  I pureed the mixture with the hand blender until smooth and continued to cook it down further until it was almost like jam.  The other half of the mixture is made from a carton of lemon yogurt, 1/3 of a cup of buttermilk, 1/4 cup half and half, 2 teaspoons lemon juice, a little lemon zest and agave. 
Some tips and observations from experimenting-  Freezing mutes the sweetness of your puree.  Keep this in mind when you taste your liquids before freezing.   Swirls and stripes are best achieved when your mixtures have the same viscosity.  Once your mixtures are in the molds insert a knife to gently create pretty swirls.  To keep your sticks in place, cover the molds with foil and pierce the foil with a sharp knife before inserting the popsicle stick into your mold.  Running hot water over the outside of the molds really helps release the ice pop.  But make sure it is thoroughly frozen first which usually takes 6 hours.

Remember my fiasco from above? Well if I had thought that through I wouldn't have put melted chocolate ganache into the mold.  Once it quickly cooled the chocolate adhered itself to the molds.  I basically had to melt my ice pops to get anything out.  


But I thought what the heck why not scrape everything off the sticks and molds and puree it in the food processor and refreeze it.  And it worked, very tasty.


Here are some additional cookbooks for making ice pops. Enjoy!


Tuesday, July 29, 2014

Summertime and the feeding is easy.


Each year my husband’s family gets together for their annual reunion.  This is no casual spur of the moment get together.  It takes a fair amount of planning and commitment.  His 6 siblings and their families make the head count 29.  Each year one sibling takes the responsibility of organizing the week -long reunion which includes the challenging task of finding a rental that can accommodate such a large group.  Then cooking nights are assigned.   In the beginning when we were a slightly smaller group, dinners were a bit more ambitious.  Now no one wants to spend an entire day in the kitchen, and cooking for so many requires streamlined menus that can be easily adapted for different diets or food allergies. Although most are meat eaters, there are a handful of both vegetarians and glutards (our affectionate label). 

This year’s kitchen was postage stamp small,  so with this in mind, our cooking group chose to do pulled pork sandwiches.  For the vegetarians we substituted veggie burgers with barbeque sauce.  Then we rounded out the meal with coleslaw and potato salad.

Pulled pork is a wonderful thing!  You can make it in advance, allowing the cook to relax, and slowly teasing appetites for hours with the lovely smell of roasting pork (well maybe not for  vegetarians).  The spice rub and the barbeque sauce can be made days ahead and all you have to do is put the pork in the oven the night before serving.  You can even cook the pork a day or two ahead and keep it in the fridge.  Then heat it covered in a 250-300 degree F oven.
  
Now here is the thing about selecting the pork. You want the part of the shoulder called the “butt.”  Why wouldn’t it be called something less confusing? I don’t know. Generally this cut averages 6 to 8 pounds and if you can get one with the bone in go for it.  It adds to the flavor.  


I found the pork rub in The Big Book of Outdoor Cooking & Entertaining by Cheryl & Bill JamisonThis is a great book that offers sidebars with lots of helpful information.  We doubled the recipe for our two butts (that's just so weird to type).

Sweet Southern Pork Rub
1/2 cup brown sugar (lightly packed)
1/4 cup ground black pepper
1/2 cup sweet paprika
2 tablespoons dry mustard
1 teaspoons cayenne
1 to 2 teaspoons cumin

Combine the rub ingredients in a small bowl.  Massage the pork well with about half of the rub. Transfer the pork to a zippered plastic bag, seal and refrigerate it overnight.  
Remove the pork from the refrigerator.  Pat the butt with another coating of the rub.  Let the pork sit at room temperature for about 45 minutes. Optional- Pour approximately 2 cups of liquid into the roasting pan to keep the pork moist and control the drippings from smoking on the bottom of the pan.  The liquid can be water, broth, apple juice or cider.  

Heat the oven to 220 degrees F.  Cook for 10 to 12 hours, tenting the pork with foil the last few hours in the oven.  Cook the pork until tender and falling off the bone.

Let the pork sit tented for about an hour, until it is cool enough to handle.  Discard the fat and bones.  Shred or chop the pork as you wish.  Finish by adding the barbecue sauce to taste (recipe below) to the shredded pork.
We chose the barbecue sauce from The America's Test Kitchen Family Cookbook.  Of course you can always buy the sauce, but this recipe is so easy to make.  The nice thing about making your own sauce is that you can tweak it to suit your taste.  And most of these ingredients tend to already be on hand.

Barbecue Sauce 

makes about 1 1/2 cups

2 tablespoons vegetable oil
1 onion, minced
1 garlic clove, minced
1 teaspoon chili powder
1/4 tsp cayenne pepper
1 cup ketchup
5 tablespoons light or dark molasses
2 tablespoons cider vinegar
2 tablespoons Worcestershire
2 tablespoons Dijon mustard
1 teaspoon Tabasco
Salt and Pepper

Heat the oil in a large saucepan over medium heat until shimmering.  Add the onion and cook until softened and lightly browned, about 5 to 10 minutes.  Stir in the garlic, chili powder, and cayenne and cook until fragrant, about 15 seconds.
Stir in the remaining ingredients and simmer, stirring occasionally, until the sauce is thickened, about 25 minutes.  Season with salt and pepper to taste.  Cook to room temperature.  The sauce can be refrigerated in an airtight container for up to a week or frozen for up to 2 months.

The patriarch enjoying his crossword puzzle.


Thursday, June 12, 2014

Say Cheese


It’s been awhile since my last post.  This was partly due to a kitchen mishap.  My common sense deserted me and I put my finger into the business end of an immersion blender and accidentally turned it on. Why would I put my finger near the blade?  Well, I didn’t want to leave behind any of my thick sauce on the blender.  That would be wasteful, right?  It’s a hang-up I've had and now I think I'm cured of it.

I'm lucky. The kitchen gods took pity on me because I still have my finger and it will soon be mended.  While I was at the hospital my husband decided to play undercover paparazzi, although at this point I’m only the star of my own kitchen debacle.   I wished he had given me the “say cheese” warning. Then I could have begged him to put his phone down.  But you can see that wouldn’t have helped since I was so focused on the sewing up of my finger. 

I think cheese is vital in so many ways... not only for photography, but most importantly for eating! The mangled finger had to stay dry which limited my ability to cook. Therefore I ate lots of cheese and crackers.  This was good, because I always find cheese so satisfying, but I was really itching to do something more than slicing and stacking.  Then I thought of ricotta. Ricotta is so much better homemade, as it is creamier, lighter, and less grainy than the mass-produced grocery store stuff. I love how it can be used in so many ways- pancakes, pasta, salads, pizza, or simply topped with fruit or spread on toast.
Bruschetta: ricotta sweetened with honey, topped with grilled stone fruit, pecans, olive oil & mint

Pizza: ricotta mixed with pesto, asparagus, tomatoes, sweet peppers
Tart: ricotta mixed with egg and sugar, topped with figs and apricots
Sometimes recipes seem more intimidating than they actually are, ricotta cheese being a perfect example of this. Making it is very straightforward and doesn't require lots of strange ingredients.  Here is your shopping list: milk, cream, lemons, cheesecloth. It also helps to have an instant read thermometer, however it is not vital.  

Ricotta  means "recooked" in Italian and is actually a by-product of cheesemaking.  In traditionally made ricotta, the whey is heated with an acid to create curds.  This recipe is a simplified method that uses milk instead of only using whey.
This recipe is from the book Home Dairy With Ashley English: All You Need to Know to Make Cheese, Yogurt, Butter & More.

Pasteurized milk is fine to use for making ricotta, but avoid using ultra-high temperature (UHT) pasteurized milk, as this process changes the protein structure of the milk and prevents it from separating.  Using 2% milk will work too, although your cheese won't be quite so creamy.  If you opt out of using a thermometer, watch your milk carefully.  You want to stop the cooking process just before your reach the boiling point. I've found that Meyer lemons just aren't acidic enough for this recipe.  If the curds are not developing, try adding a little more lemon juice or white vinegar.

Ricotta

8 cups whole milk
1 cup heavy cream
1/2 cup lemon juice or white vinegar
1/2 teaspoon salt


1) In a large saucepan, stir together the milk, cream, and lemon juice with a metal spoon. 
 2) Gradually warm the mixture to 170°F directly over medium-low heat.  Monitor the temperature closely with an instant read thermometer or a dairy thermometer to avoid overheating.  Expect this to take about 30 minutes.  Stir only once or twice while heating to prevent sticking; any more and you run the risk of making the curd too small.

3) Increase the heat gradually until the mixture reaches 200°F.  This will take anywhere from 4 to 7 minutes.  Be sure to stop just before the boiling point.  Your curds should look similar to cottage cheese floating in the liquid whey.
4) Remove the pot from the heat, and allow to rest for 20 minutes.  Meanwhile, line a colander with 2 layers of cheesecloth.

5) Gently ladle the curds into the colander, and allow the whey to drain from the ricotta for at least 20 minutes.  For a firmer, drier curd, allow the curds to drain an additional 20 to 30 minutes.

6) Add the salt and stir to incorporate.  Use the ricotta immediately or place it in a lidded container and store in the refrigerator.  Use within 4-5 days.

Here is a great way to use your ricotta.  I've adapted the recipe from The Cook's Illustrated Cookbook.  It's wonderful on pasta, pizza or even as dressing for sandwiches.

2-3 garlic cloves, peeled
1/4 cup pine nuts 
1 cup arugula
1 cup fresh parsley
5 tablespoons extra-virgin olive oil
2 tablespoons water
2 tablespoons grated Parmesan cheese
5 tablespoons extra-virgin olive oil
1/3 cup ricotta cheese 

Place first 7 ingredients in a food processor and pulse while slowly pouring in the olive oil.  Scrap down the sides of the bowl as needed.  Transfer pesto to a small bowl and stir in ricotta.  Season with salt and pepper to taste.  Mixture can be refrigerated for up to 3 days in a closed container.


For other recipes using ricotta checkout:
Silver Spoon
Baking Illustrated
How to Cook Everything Vegetarian