
Marbleized eggs


Marbleized Easter Eggs How-To
1. Prepare a dye bath in a small heatproof mixing bowl: Mix 1 teaspoon of vinegar and 20 drops of food coloring (use more to intensify color) with 1 cup of hot water. Add an egg, and submerge it until it turns the desired hue. Remove egg; let dry, about 15 minutes.
2. In a shallow, wide bowl, prepare another batch of dye in a darker or different shade; this will provide the swirls. The liquid should be 1/2 inch deep. Add about 1-2 teaspoons of cooking oil (you may need more depending on the size of the container). Run a fork through this mixture, creating swirls of oil on the surface. Place the dyed egg in the marbleizing mixture, and roll it once around the bowl to pick up the oil streaks; remove, and blot gently with a paper towel. Let dry, 30 minutes.
 |
| For more distinct veining don't pat dry. |
 |
| tip- Dip egg rather than let it roll around in the dye. |
Ukrainian Decorated Eggs

Also known as pysanky this type of egg decorating offers striking results. I like to think of it as doodling on eggs with wax. It is just like batik, but instead of fabric you're working on an egg shell. As you draw on the egg with wax it then protects that area from the next dye that egg is dipped into. You repeat this process going from the lightest to the darkest color of dye. The best part is when you melt the wax off revealing the bright colors underneath. This process is not as difficult as you might imagine, just a bit time consuming, but in a very good way!


Basic Instructions
These are streamlined instructions, for more complete directions and numerous design ideas consult the book Decorating Eggs by Jane Pollack. You'll need some
inexpensive, but unique supplies. I've found two places in the area
that sell the supplies- Rainbow Fabrics in Fairfax and The Caning Shop
in Berkeley. There are kits you can buy that have the dyes, kistka, beeswax and often include a booklet of instructions and designs. You can
also easily find these supplies on the internet.
Supplies you will need: raw room temperature white eggs, beeswax, kistka, dyes, candle, pencil, and paper towels.
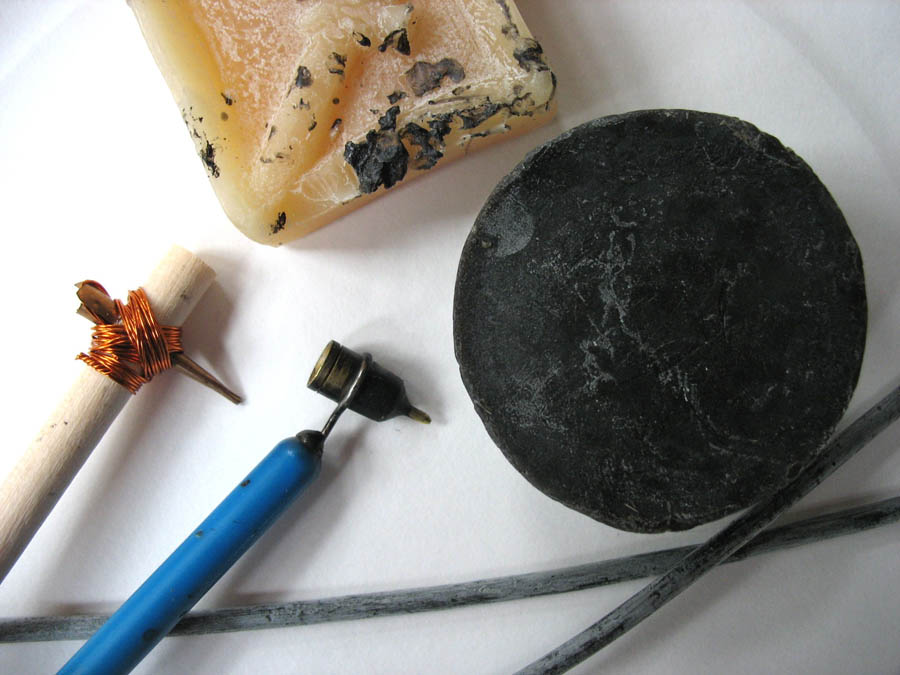 |
| kistkas & beeswax |
2. Make sure your eggs are at room temperature. Wax will not stick to cold, damp eggs and dying will be uneven.
3. Lightly draw on your design and/or guidelines on your egg with the pencil. Try using a rubber band to help with drawing long straight lines. Do not erase any mistakes, erasing can cause uneven dying. The pencil marks disappear when the wax is melted off.

 |
| Heating the kistka and scouping up wax. |
 |
| If you overheat the wax it will puddle. Practice first on some paper. |
5. Draw everywhere you want the egg to be white.
 |
| Hold your pinky finger against the egg to keep your hand steady. |

7. Using a spoon carefully lower the egg into the dye. Dropping the egg into the dye bath can cause the shell to crack. The time the egg spends in the dye bath varies. Some colors take right away after a few seconds, some can take 5 to 15 minutes. When you are happy with the color of your egg remove the egg from the dye using the spoon to raise the egg out of the bath. Carefully pick up the egg off the spoon with a clean paper towel and gently pat the egg dry. Keep in mind that the dye on the paper towel can get transferred onto clean eggs or eggs dyed other colors so use clean towels for each color.

8. Wipe spoons clean before putting them into different dye baths.
9. Repeat the process for each color you want to add, adding wax to your design to keep the surface color. It is best to start from your lightest color and work up to your darkest. For example: yellow, orange, pink, red, and ending with blue or black.
 |
| This shows the progression after yellow- orange, pink and red. |
10. On your final color you will not add any wax. Pat dry and get ready for the big reveal. Use a candle stick rather than a pillar candle, you need the flame exposed. Hold the egg next to the flame, not in it or above it for a few seconds. Wipe away the melted wax with a clean paper towel or bathroom tissue.

 |
| Finished! |
I don't blow out my eggs. While many pysanky artists advise blowing out your eggs, you really don't have to do this extra step. I don't like how blown eggs float in the dye. You have to weigh the eggs down in the dye bath which can be challenging. So I leave my eggs whole and eventually the inside will dry out. If you are careful in how you handle and store your eggs you can have eggs that last years. Store in a cool area in paper egg cartons. Or you can coat the egg with a high-gloss or matte-finish polyurethane. Make sure to use a product that is not water soluble, you want an oil based product. After the egg has dried it is safe to blow it out if desired.

 |
| Eggs done by a 10 year old |
When it is time to display your eggs make sure not to place them in the sun, let children shake them, or get any moisture on them. Oh and you don't eat these eggs!
Silk Dyed Eggs


For this project you need 100% silk fabric, not silk blended with other material. Try using silk ties. You can find them at thrift stores. I was amazed at the quantity of ties that Goodwill had. Or if you can use old silk garments or scarves.
 |
| Look for bright, printed patterns. |
Silk-Dyed Easter Eggs How-To1. Cut silk into pieces large enough to wrap around a raw egg.

2. Tightly wrap a raw egg with a piece of silk, making sure the printed side of the material is facing the egg. Secure with a twist tie.

3. Place the silk-wrapped egg in a piece of undyed cotton and secure tightly with another twist-tie.

4. Place egg(s) in an enamel or glass or nonreactive pot. Fill the pot with enough water to cover eggs completely. Add three tablespoons of white vinegar to the water.

5. Bring water to a boil, turn heat down, and simmer for 40 minutes or longer.
6. Remove eggs from water with tongs or spoon, place on a cooling rack, and let cool.
7. Remove silk from cooled egg.
8. For shiny eggs, wipe with a paper towel dabbed in vegetable oil.
 |
| Bet this one is tough to pedal, but with decorated eggs who cares! |