Sunday, March 24, 2013

Egg stravaganza - Three ways to decorate your eggs!

Marbleized eggs
These marbleized eggs are from Martha Stewart's Handmade Holiday Crafts.  There are many egg dying and decorating ideas in this book and this one looked the most kid friendly.  It is very simple, although you will want to supervise young children if you don't want food coloring in unexpected places.  Two tips- Use less oil, a tablespoon was too much.  Also I had better results when I dipped the eggs in rather than rolling the egg in the dye.
Marbleized Easter Eggs How-To 
    1. Prepare a dye bath in a small heatproof mixing bowl: Mix 1 teaspoon of vinegar and 20 drops of food coloring (use more to intensify color) with 1 cup of hot water. Add an egg, and submerge it until it turns the desired hue. Remove egg; let dry, about 15 minutes.
     2. In a shallow, wide bowl, prepare another batch of dye in a darker or different shade; this will provide the swirls. The liquid should be 1/2 inch deep. Add about 1-2 teaspoons of cooking oil (you may need more depending on the size of the container). Run a fork through this mixture, creating swirls of oil on the surface. Place the dyed egg in the marbleizing mixture, and roll it once around the bowl to pick up the oil streaks; remove, and blot gently with a paper towel. Let dry, 30 minutes.
For more distinct veining don't pat dry.

tip- Dip egg rather than let it roll around in the dye.

Ukrainian Decorated Eggs
Also known as pysanky this type of egg decorating offers striking results.  I like to think of it as doodling on eggs with wax.  It is just like batik, but instead of fabric you're working on an egg shell. As you draw on the egg with wax it then protects that area from the next dye that egg is dipped into.  You repeat this process going from the lightest to the darkest color of dye.  The best part is when you melt the wax off revealing the bright colors underneath.   This process is not as difficult as you might imagine, just a bit time consuming, but in a very good way!

 Basic Instructions 
These are streamlined instructions, for more complete directions and numerous design ideas consult the book Decorating Eggs by Jane Pollack.  You'll need some inexpensive, but unique supplies.  I've found two places in the area that sell the supplies- Rainbow Fabrics in Fairfax and The Caning Shop in Berkeley.  There are kits you can buy that have the dyes, kistka, beeswax and often include a booklet of instructions and designs.  You can also easily find these supplies on the internet. 

Supplies you will need: raw room temperature white eggs, beeswax, kistka, dyes, candle, pencil, and paper towels.
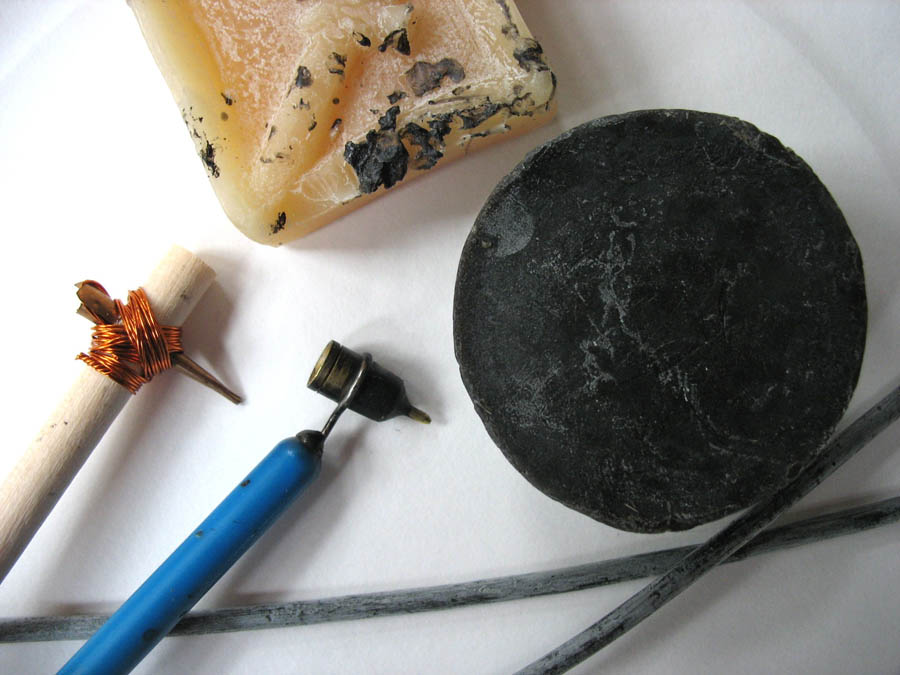
kistkas & beeswax
1.  Wash your hands! Oils from your hands will adhere to the egg shell and make the dying uneven. 

2.  Make sure your eggs are at room temperature.  Wax will not stick to cold, damp eggs and dying will be uneven.

 3.  Lightly draw on your design and/or guidelines on your egg with the pencil. Try using a rubber band to help with drawing long straight lines.  Do not erase any mistakes, erasing can cause uneven dying.  The pencil marks disappear when the wax is melted off.
 4.  When you are ready to use the kistka light your candle and heat the brass funnel part (not the tip) of the of the tool in the flame.  Use the heated part of the funnel to scoop out a little bit of beeswax.  It will melt from the heat.  Practice drawing on a some paper until you get the wax easily flowing and you feel comfortable using the tool.  I like to work on a paper plate and use it to test the flow of the melted wax.  The kistka and melted beeswax will eventually pick up some of the soot from the flame, this is normal and helpful, as it is much easier to see the darkened wax on egg shell. You will need to reheat your kistka in the flame every so often to keep the wax melted.  Draw on the egg as you would a pencil.
Heating the kistka and scouping up wax.
If you overheat the wax it will puddle. Practice first on some paper.
5.  Draw everywhere you want the egg to be white.

Hold your pinky finger against the egg to keep your hand steady.
6.  Dip your egg for 30 or so seconds into a bath of one quart of water with a couple of tablespoons of vinegar.  This will clean the egg of any oils and help the egg take the dye evenly. Dry egg with paper towel, patting not rubbing.
7.  Using a spoon carefully lower the egg into the dye.  Dropping the egg into the dye bath can cause the shell to crack.  The time the egg spends in the dye bath varies.  Some colors take right away after a few seconds, some can take 5 to 15 minutes.  When you are happy with the color of your egg remove the egg from the dye using the spoon to raise the egg out of the bath.  Carefully pick up the egg off the spoon with a clean paper towel and gently pat the egg dry.  Keep in mind that the dye on the paper towel can get transferred onto clean eggs or eggs dyed other colors so use clean towels for each color.
8.  Wipe spoons clean before putting them into different dye baths. 

9.  Repeat the process for each color you want to add, adding wax to your design to keep the surface color.  It is best to start from your lightest color and work up to your darkest.  For example: yellow, orange, pink, red, and ending with blue or black.

This shows the progression after yellow- orange, pink and red.
10.  On your final color you will not add any wax.  Pat dry and get ready for the big reveal.  Use a candle stick rather than a pillar candle, you need the flame exposed.  Hold the egg next to the flame, not in it or above it for a few seconds.  Wipe away the melted wax with a clean paper towel or bathroom tissue.
Finished!
I don't blow out my eggs.  While many pysanky artists advise blowing out your eggs, you really don't have to do this extra step.  I don't like how blown eggs float in the dye.  You have to weigh the eggs down in the dye bath which can be challenging.  So I leave my eggs whole and eventually the inside will dry out.  If you are careful in how you handle and store your eggs you can have eggs that last years.  Store in a cool area in paper egg cartons. Or you can coat the egg with a high-gloss or matte-finish polyurethane.  Make sure to use a product that is not water soluble, you want an oil based product.  After the egg has dried it is safe to blow it out if desired.

Try not be intimidated or overwhelmed by the work of expert pysanky artists.  With a bit of practice you can create lovely eggs.  Consider experimenting by applying these techniques in non-traditional ways.  Writing on the egg with the kistka stylus takes a little practice, but even children with adult supervision can produce exciting results.   
Eggs done by a 10 year old
When it is time to display your eggs make sure not to place them in the sun, let children shake them, or get any moisture on them.  Oh and you don't eat these eggs!


Silk Dyed Eggs


For this project you need 100% silk fabric, not silk blended with other material.  Try using silk ties. You can find them at thrift stores.  I was amazed at the quantity of ties that Goodwill had. Or if you can use old silk garments or scarves.  
Look for bright, printed patterns.
Silk-Dyed Easter Eggs How-To1. Cut silk into pieces large enough to wrap around a raw egg.
2. Tightly wrap a raw egg with a piece of silk, making sure the printed side of the material is facing the egg. Secure with a twist tie.
3. Place the silk-wrapped egg in a piece of undyed cotton and secure tightly with another twist-tie.
4. Place egg(s) in an enamel or glass or nonreactive pot. Fill the pot with enough water to cover eggs completely. Add three tablespoons of white vinegar to the water.
5. Bring water to a boil, turn heat down, and simmer for 40 minutes or longer.

6. Remove eggs from water with tongs or spoon, place on a cooling rack, and let cool.

7. Remove silk from cooled egg.

8. For shiny eggs, wipe with a paper towel dabbed in vegetable oil.


Bet this one is tough to pedal, but with decorated eggs who cares!
               

Thursday, February 7, 2013

Ready Set Cook!


I am very slow in the kitchen.  Most dinners take me 1- 2 hours to make.  Understandably this makes me grumpy after a long day at work.  So being a huge fan of Jamie Oliver I decided to try his book Meals in Minutes.   Each meal which includes a main and side dishes, as well as a dessert is supposed to take just 30 minutes! With 50 creative menu choices and easy to follow directions this book is a winner. Like all of his cookbooks this one is filled with beautiful photos to help inspire and motivate the home cook. His instructions are quite precise. As he states, they "are carefully choreographed so no single minute is wasted."  I've always wanted to cook with the incredible ease that Jamie has, so I was sold.  I chose- Stuffed Focaccia, Prosciutto with Celery Root Remoulade, Dressed Mozzarella and Banana Ice Cream (which I substituted from another meal).
I put out all my ingredients before I set the timer and started cooking.  I didn't try to rush and it took me only 40 minutes.  I probably would have been faster if I had reread the instructions right before I started, but even so I was happy with the time savings.
So gather together all the tools, serving dishes, and ingredients before you begin.  Reread the directions. Oh, and check the bottom of your focaccia for dimples before you cut it in half. Otherwise you will have annoying holes in your lovely sandwich like I did. 
I've provided two of the recipes here, but if you want to make the whole meal the "Jamie way" get yourself a copy of the book- Meals in Minutes by Jamie Oliver
Stuffed Focaccia
This is an especially versatile & tasty sandwich filling- leave out the cheese and its vegan, add prosciutto for meat eaters or consider adding other veggies like marinated artichokes, paper thin onion slices, sauteed eggplant or roasted cauliflower.

1 x 16 ounce focaccia loaf (Semifreddi's makes a lovely rosemary focaccia)
1 x 16 ounce jar roasted red peppers 
1 teaspoon capers, drained
6 sun-dried tomatoes in oil
Large handful of good quality marinated olives
Large handful of cherry tomatoes
1 fresh red chile
3-5 cornichons (small pickles)
Small bunch of fresh mint
1/2 lemon
Parmesan cheese, for grating
(I also added small handful of chopped marinated artichokes)

Put the focaccia in the oven to warm (300 degrees) for 10-15 minutes.  Make your filling: put the roasted red peppers, the capers, the sun-dried tomatoes, the olives (pitted), the cherry tomatoes, and the cornichons on a chopping board.  Add the leaves from the mint. Add the thinly sliced chile.  Then chop and slice all the filling ingredients together on the board and sweep into a bowl.  Add a lug of extra virgin olive oil, squeeze the juice from the lemon and then mix everything together.  Taste to check the flavors.  Take the focaccia out of the oven.  Carefully halve it across the middle with a sharp serrated bread knife.  Spread the filling over the bottom half, drizzle over any juices left behind in the bowl, and finely grate over a good layer of parmesan.  Put the top on the sandwich.  Cut into serving portions.

Banana Ice Cream (Banana Frozen Yogurt)
A super easy and super healthy dessert!

6 bananas (approx. 2 pounds), peeled, sliced and put into the freezer for at least 6 hours in advance.
1 cup low fat plain yogurt (highly recommend Fage brand)
1 tablespoon honey
2-3 handfuls of unsweetened shredded coconut (I toasted mine)
(I also added the zest from half of a lime)

In a food processor whiz the frozen bananas with yogurt and honey until thick and creamy.  Put the shredded coconut into a bowl, then scoop out  a spoonful of the banana mixture  and roll it in the coconut until covered.  Divide into serving cups and put into the freezer until you're ready for dessert.  (Best eaten after 30 minutes to an hour in the freezer, otherwise the mixture will get too hard.)


Thursday, January 10, 2013

Kitchen Break-In

Almond Financiers in the Finished Kitchen

After seven months the kitchen remodel is finally finished.  Wahoo, no more cooking in my parka, boiling water to wash pots or surprising foraging raccoons!  I only had two meltdowns.  Well ok, three, but they were all justified, at least in my mind.  


For those of you who love before and after photos, here are two I found from when we moved into the house in 1995.   We have forever banished the color coral from this house!

Our first meal was total comfort food, grilled cheese sandwiches on a rainy night, but the oven needed to be baptized, so to speak.  So I chose Financiers, also sometimes referred to as Friands.  These are deeply satisfying little French cakes.  They can be complicated to make, but I found a much simpler recipe that gives my local bakery a run for their money.   While these cakes look very pretty made with the scalloped molds they taste just as good made in muffin/cupcake pans.
Almond Financiers
Adapted from Martha Stewart Living, February 2008
makes approximately 10-12

8 tablespoons (1 stick) unsalted butter (Use a good quality butter)
1/3 cup honey
1 cup almond meal (can be found at Trader Joe's)
1/2 cup granulated sugar
1/4 cup sifted confectioners' sugar
3/4 cup sifted cake flour (not self-rising)
1/2 teaspoon salt
5 large egg whites

Preheat oven to 350 degrees.  Brush muffin pan or molds with butter or use parchment cupcake liners.

Melt butter in a small saucepan over medium-low heat, whisking frequently, until golden brown, 6-7 minutes.  Add honey and whisk until combined.  Remove from heat.

Mix almond meal, sugars, flour, and salt.  With mixer on medium speed add egg whites, one at a time, beating after each addition until just combined.  Scrape down sides of bowl.  Reduce speed to low, and add warm butter/honey mixture in a slow, steady stream.  Raise speed to high, and beat for 45 seconds more.

Spoon batter into muffin cups or molds. Bake until edges are golden brown, 15-25 minutes. Rotate pan/molds after approximately 10 minutes to brown evenly.  Let cool slightly (about 5 minutes) before unmolding cakes.  Don’t wait too long or cakes will be difficult to remove from molds.  You may need to use the tip of a knife to help release the cakes from the molds. Financiers are best served warm or the same day they are baked.  These cakes can be kept for up to 3 days, stored in an airtight container at room temperature.
Other Financier recipes can be found in:

Thursday, November 8, 2012

Get Your Accordion Ready For The Holidays!


Not too many people have the ability to play this charming instrument, but almost all of us can fold paper and thus create accordion pleats.  This easy and fun project has so many uses- cards, mini-books, photo albums, gift tags, and little journals.

They make memorable handmade gifts that don't cost a fortune or require a bunch of tools. You just need paper, scissors or craft knife, ruler and glue or glue stick.
You can really experiment with this project.  Try different sized paper, but be sure you have a square.  You can make as many pockets as you want or just use one for a tag or ornament.  
My favorite part of this project is choosing the paper!  The thinner the paper the easier it is to fold, but you can still use heavier papers such as scrapbooking paper or cardstock.  Here is an idea- have your kids color and decorate paper that you then fold into the pockets. Finish by adding photos of the kids, creating a special photo album for a family member.  

This project came from a wonderful book called Origami Card Craft by Karen Elaine Thomas.
In this book the author goes over the basic folds and also provides illustrations with directions. To make this even easier I found this video clip of the author demonstrating this project!  Now there is no excuse not to try this out.
With over 25 projects you could keep yourself busy folding for weeks on end, of course with accordion music playing in the background.